• About Us
  • News And Events
  • Support & Resources
  • Contact
Facebook
Twitter
LinkedIn
YouTube
Instagram
860-829-2244
LOG IN
Direct Color SystemsDirect Color Systems
  • Printers
    • Direct Jet UV Printers
      • UV-21MP – Small Format UV Printer
      • UV-32MP – Intermediate Format UV Printer
      • UV-44DTS – Medium Format UV Printer
      • UV-84DTS Gen2 – Large Format UV Printer
      • 1800s – Small Format LED Printer
    • VIBRAHue UV Printers
    • Custom Engineered Inkjet Printers (OEM)
    • Software: Color Byte Rip V10
    • Inks & Jigs
      • UV LED Inks
      • Custom Jig & Fixtures
    • Substrates and Supplies
      • InkMark™ UV Coated Metal Substrates
      • Plastic & Sheet Metal Stock
      • Name Badge Blanks
      • Name Badge Supplies
      • Acrylic Blanks
  • Applications
    • UV-DTF
    • Acrylic Printing: Awards, Plaques
    • Ad Specialty Digital Decorating
    • ADA-Compliant Braille Sign Printers (Patented)
    • Aluminum Printing
    • Bottle & Cylindrical Printing
    • Cell Phone & Tablet Cases
    • Glass Printing
    • Golf Ball Printing
    • Industrial Labeling, Dial Faces & Serial Plate Printing
    • Industrial Part Marking
    • Luggage Tag Printing
    • Name Badge Printing
    • Sign Printing
    • Textured Printing (TEXTUR3D™)
    • Tile Printing
    • UV Printing
    • Wood Printing
    • DTG / T-Shirt Printing (Patent Pending)
  • PRINTOVATORS™
  • Blog
  • Contact
    • Contact Information
    • Commercial UV Printer Leasing and Financing
    • Employment Opportunities

Tech Tip: Using the Badge Function to Apply Variable Data

August 20, 2014Dev SupportDcs Tips

1. Group Objects and Add Text

First you will need to group the entire object, except the intended variable data. In this example, the football image, WarDogs Football logo, and the text "2013-14 State Champs" need to be grouped together. To group, simply select the preferred objects and choose Layout > Group. Then add a line of text, in this case "Name and #". This will become the variable data.
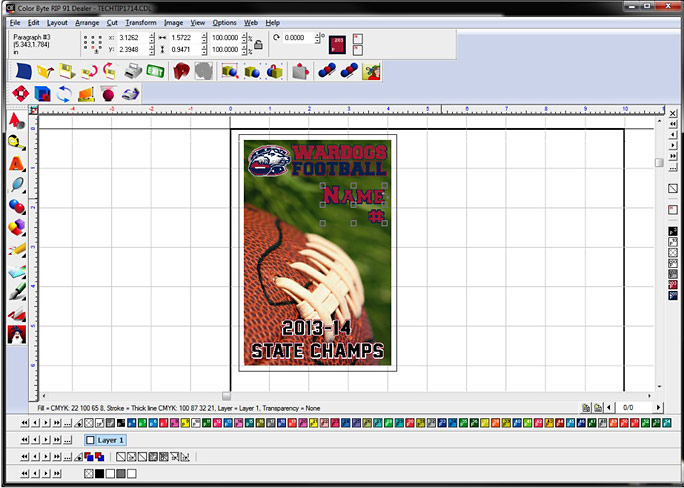
 

tt-badge_1


2. Badge Setup

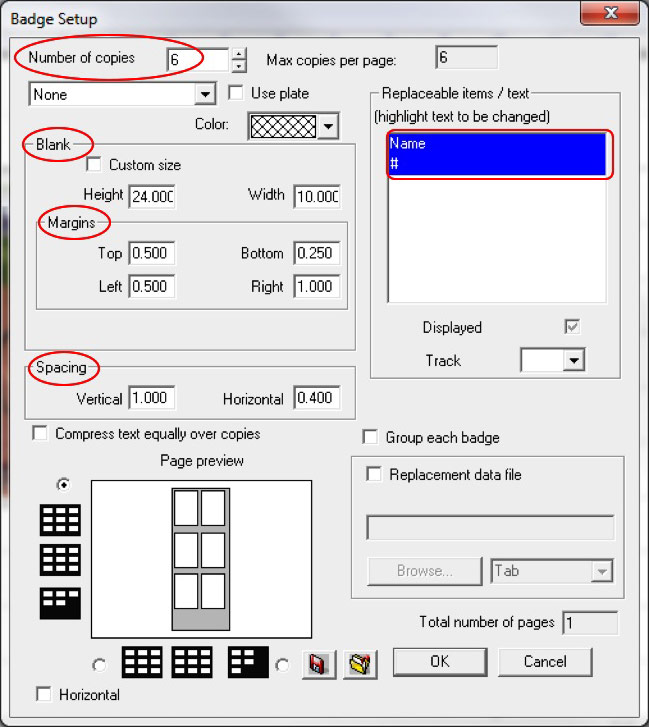
Next, select the entire image including the outline. Go to Layout > Badges. This will bring up the "Badge Setup" dialogue window, as shown below.
 

tt-badge_2


  1. First, make sure the "Use plate" box is unchecked and "None" is selected.
  2. The items circled in red above are the options needed to complete the function.
  3. "Number of copies" represents the number of actual printed pieces.
  4. "Blank" displays the size of the print area. In most cases this will be 10”x24”, which is the max size and size of the bed.
  5. "Margins" displays the spacing from all four substrate edges.
  6. "Spacing" displays the desired vertical and horizontal spacing between the pieces.
  7. Input all desired options.
  8. You can see the preview in the "Page preview" section below the options.  If a jig is being used, input the spacing according to the jig. Before selecting OK, click to highlight the "Replaceable items/text."  This will highlight the variable data in blue, as shown above.

3. Text Substitution

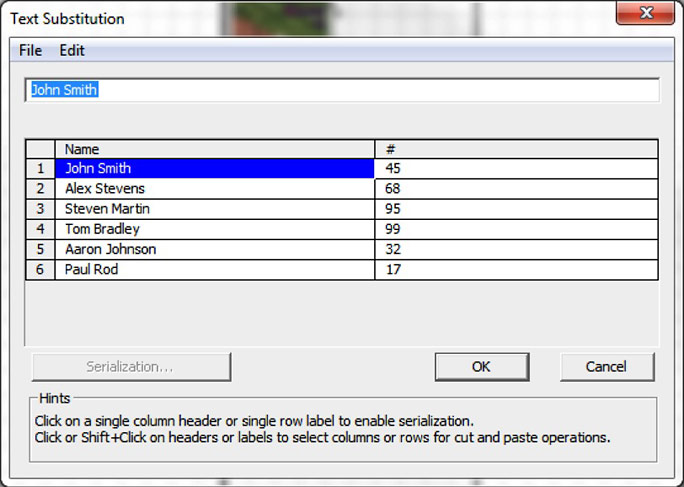
After clicking OK on the Badge Setup window, the Text Substitution will appear. Populate with desired information, in this case "Name and #". Then click OK.
 

tt-badge_3


4. Preview the Image Array

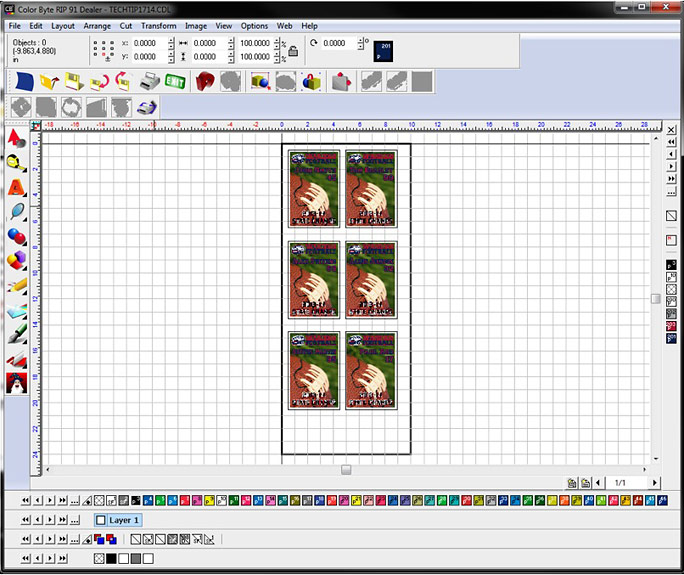
This will array the image with variable data as shown below.


tt-badge_4

Dev Support
Previous post Tech Tip: 3 Color Byte Design Tools that Help Improve Image Quality Next post The Many, Many Uses of a UV Printer

DIRECT COLOR SYSTEMS, TEXTUR3D, and INKMARK are the subjects of US Patent and Trademark Office trademark registrations owned by Direct Color Inc. dba Direct Color Systems.

For Terms of Sale, click the link.

For Purchasing Terms and Conditions, click the link.

Recent Posts

  • 2025 Tradeshows – Graphics Pro Expo – Indy 2025 March 26, 2025
  • 2025 Tradeshows – Graphics Pro Expo – Irving TX 2025 February 24, 2025
  • 2025 Tradeshows – FESPA Global Print Expo 2025 February 10, 2025
  • TechTips: January 2025 – Using Third-Party Inks and the Risks Involved January 31, 2025

Contact Us


    Direct Color Systems © 2024 | Private Policy | Responsive Wordpress Website Design by Zero Gravity Marketing