• About Us
  • News And Events
  • Support & Resources
  • SDS Library
  • Contact
Facebook
Twitter
LinkedIn
YouTube
Instagram
860-829-2244
LOG IN
Direct Color SystemsDirect Color Systems
  • Printers
    • Direct Jet Printers
      • CHROMASPHERE
      • UV-21MP – Small Format UV Printer
      • UV-32MP – Intermediate Format UV Printer
      • UV-84DTS Gen2 – Large Format UV Printer
      • UV-44DTS – Medium Format UV Printer
    • VIBRAHue UV Printers
    • Software: Color Byte Rip V10
    • Inks & Jigs
    • Substrates and Supplies
  • Applications
    • UV-DTF
    • Acrylic Printing: Awards, Plaques
    • UV Printing
    • Ad Specialty Digital Decorating
    • ADA-Compliant Braille Sign Printers (Patented)
    • Aluminum Printing
    • Bottle & Cylindrical Printing
    • Wood Printing
    • Cell Phone & Tablet Cases
    • DTG / T-Shirt Printing (Patent Pending)
    • Eco-Friendly Awards & Plaques
    • Tile Printing
    • Textured Printing (TEXTUR3D™)
    • Glass Printing
    • Luggage Tag Printing
    • Name Badge Printing
    • Golf Ball Printing
    • Sign Printing
    • Industrial Labeling, Dial Faces & Serial Plate Printing
    • Industrial Part Marking
  • PRINTOVATORS™
  • Blog
  • Contact
  • Elementor Page #8522

Tech Tip: 3 Color Byte Design Tools that Help Improve Image Quality

July 20, 2014Dev SupportDcs Tips

1. Clean Up White

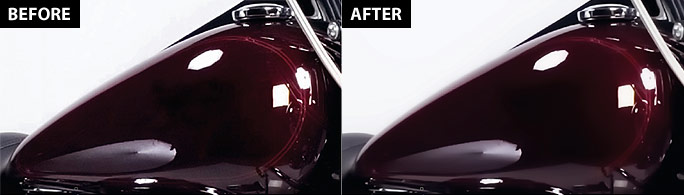
Many images have been compressed multiple times before they are finally imported into Color Byte. These compressions can leave stray data in the white areas of a raster image. The Clean Up White function helps to remove this undesirable data and will help when using other tools such as Knock Me Color to further improve quality. Simply select your image and go to Images > Easy Color Adjustments > Clean Up White. This can be done multiple times on images that require. Below is a before and after.


tt-3colorbyte_1


2. Knock Me Color

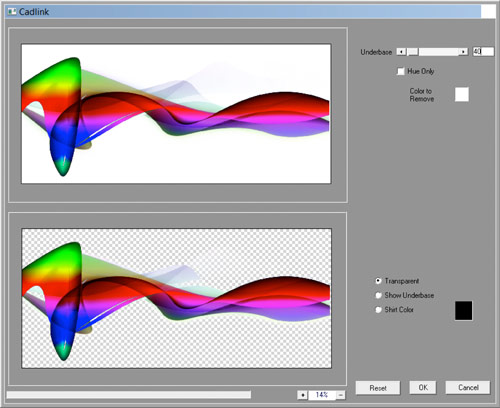
It is always best to get rid of any white background on a bitmap. The RIP will most likely pick up the white background as color data and will end up jetting clear ink around the entire bitmap. The Knock Me Color tool will help to remove that white space from the image and leave a transparency that the RIP will no longer see as data. Select your image and go to Image > Substrate > Transparency.


tt-3colorbyte_2


3. Noise Shampoo

This is a very specific tool to remove any noise present in an image. Similar to the Super Size function, this tool helps to smooth out certain areas of an image. Select your image and go to Image > Mehdi 2 > Noise Shampoo.


tt-3colorbyte_3

Dev Support
Previous post Tech Tip: Setting Up and Printing ADA-Compliant Signs Next post Tech Tip: Using the Badge Function to Apply Variable Data

DIRECT COLOR SYSTEMS, TEXTUR3D, and INKMARK are the subjects of US Patent and Trademark Office trademark registrations owned by Direct Color Inc. dba Direct Color Systems.

For Terms of Sale, click the link.

For Purchasing Terms and Conditions, click the link.

Recent Posts

  • 2025 Tradeshows – Graphics Pro Expo – Indy 2025 March 26, 2025
  • 2025 Tradeshows – Graphics Pro Expo – Irving TX 2025 February 24, 2025
  • 2025 Tradeshows – FESPA Global Print Expo 2025 February 10, 2025
  • TechTips: January 2025 – Using Third-Party Inks and the Risks Involved January 31, 2025

Contact Us


    Direct Color Systems © 2024 | Private Policy | Responsive Wordpress Website Design by Zero Gravity Marketing